Making a Game - Creating a Background - EP 11
by Damien
Video Tutorial
Aims of this Tutorial
- Create a space scene in Blender.
- Render that scene and put into a format compatible with Godot.
- Import the render as a panoramic sky.
Creating a space scene in Blender
Firstly, we need to set up the scene. Delete all the objects, and, in the world properties, set the ambient lighting to 0 and the colour to black.
Creating a Star
Since we want lots of stars and they will be very small (this is to avoid having stars light years away from the camera, since Blender would most likely crash if you tried), we can make them low poly. In order to do this, create an icosphere and reduce the subdivisions to the minimum. Don't worry about the scale too much for now, because we can scale them down later using individual origins.
Now you have the basic object, head over to the shading tab and turn on scene world and scene lights. Add a material to the star and replace the 'Principled BSDF' node with an 'Emission' node. Make sure the output of the emission goes into the surface of the material output. Now, we need to control the colour and strength of the star with nodes. Ideally, we want a random colour and strength, but this is not something we can do in a shader, so what do we do?
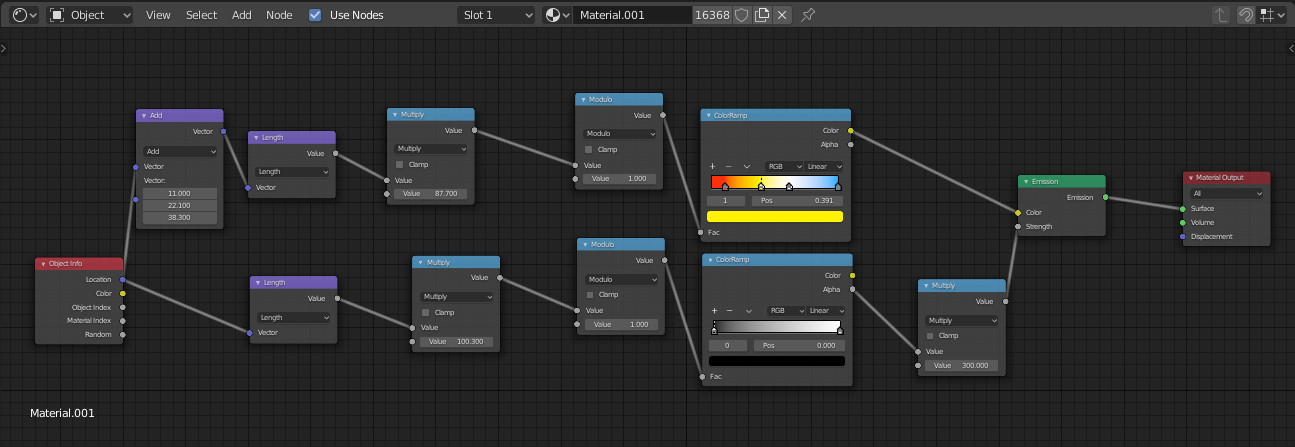
Generating a pseudo-random number is fairly easy. We need a seed and a hash function (one-way function). We will get the seed from the location of the object and, since we don't need a cryptography suitable random number, we will simply multiply by a large number and take the modulus of the number. So in total our nodes should go something like so:
Object Info (Location) -> Vector Math (Add, Constant Vector, Optional) ->
-> Vector Math (Length) -> Math (Multiply, Large Number) -> Math (Modulo, 1)
We will reuse this set up later, so make sure you understand it! We will now take a random number and put it into a 'ColorRamp' node. This allows us to determine the colour of the star with this number. Since the possible star colours we see in real life are Red (e.g. Betelgeuse), Yellow (e.g. Alpha Centauri B), White (e.g. Our Sun) or Blue (e.g. Rigel), I would recommend creating a gradient involving just those colours, but feel free to get creative and choose green and pink stars if you want to! Finally, plug the colour output into the colour input of the emission shader.
Now we can use that same random number generator with a different vector in the vector addition node (so we get a different random number) and plug that into another 'ColorRamp'. This time, we want to create a scale of transparency, so make one end transparent and the other opaque and play around with the gradient until you like it. Then, we need to plug the alpha into a 'Multiply' node (under 'Math') to increase the maximum brightness by whatever you put as the second value in the Multiply node. Finally, plug the value into the Strength for the emission shader.
By the end you should have a graph that looks something like this:
Making More Stars
Now we need to make more stars so that we can have a starry sky (unless you only want one star of course!). To do this, select your star, hit Shift+D, Esc, A and repeat until you have a satisfactory amount of stars. I went with about 1000. Now select all your stars (shortcut is 'A') and go to object -> transform -> randomize transform. Now increase the translations to 100m in all directions, 180 degrees in all axes , 5 in all scale axes and turn on proportional scaling. This will move your stars all about and scale them up to 5x.
Now to make small clusters of stars, like we tend to see in real life, we need to duplicate our stars again a few times (I did 5 times) and give it another random transform. This time, turn on delta translations and reduce the translation to about 5m in all directions. Once you are happy, move to the next step!
Making Nebulae
So far, the scene feels a little empty. To remedy this, some subtle nebulae will help bring some life into this scene. To start simply make a cube, scale it into a cuboid of your choice, and head into the shading tab.
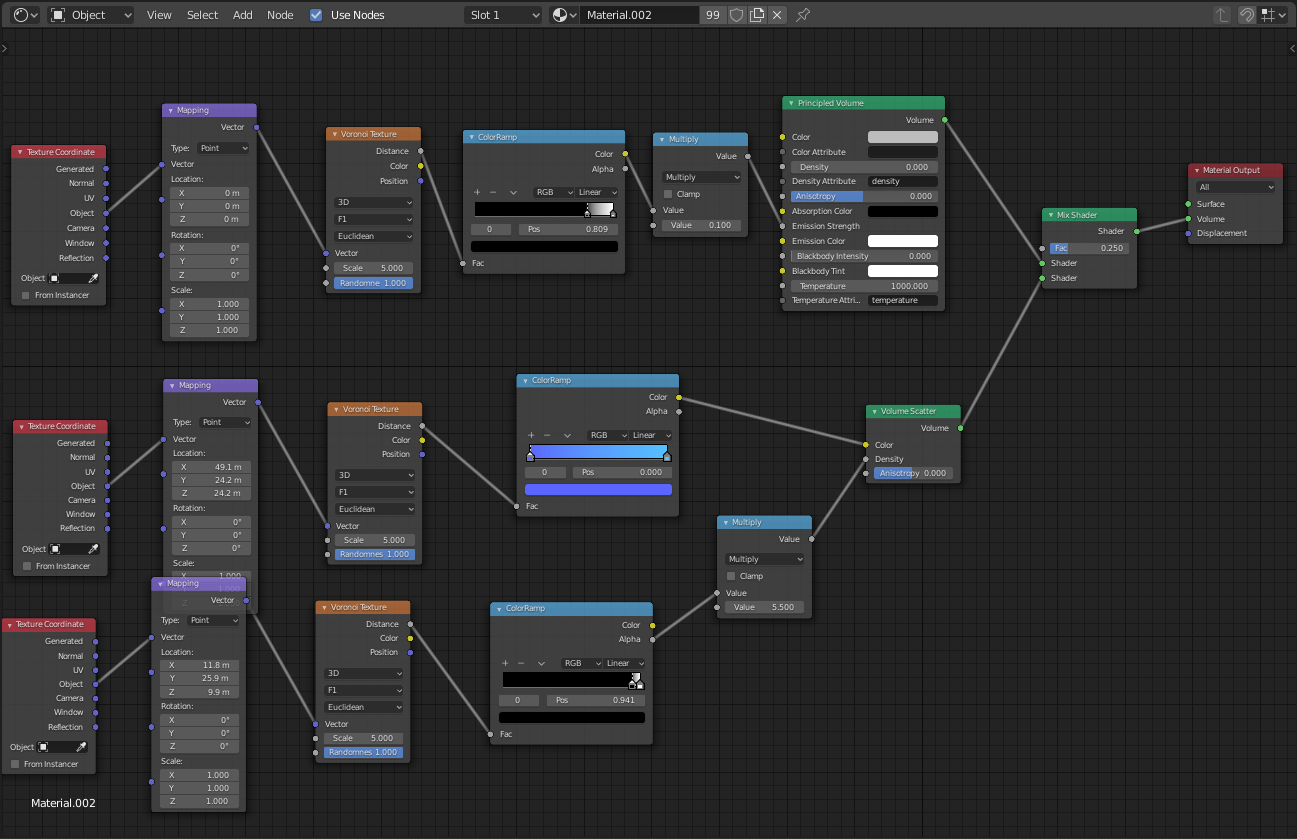
This time, we want to use two shaders at the same time. In order to do this, we use a 'Mix Shader' shader which plugs into the volume (since we are doing a gassy material). We then put in the two shaders: 'Principled Volume' and 'Volume Scatter'. This will give a gassy effect that will also scatter light from stars in or behind the nebula.
A crucial element is to make 'blobby' sections. To do this we need to use a 'Voronoi Texture'. We can plug in the 'Object' output of the 'Texture Coordinate' node via the 'Mapping' node (which can use an offset to change where the blobs are) into the 'Vector' input of the 'Voronoi Texture' node. Make sure you are on 3D, F1 and Euclidean settings and feel free to play with the scale and randomness settings. From now on, I will call this entire setup the 'Voronoi setup' and we will use it a few times during this tutorial.
Firstly, lets work on the principled volume. This is the part that gives the blotchy cloudy things. To create it, simply take a Voronoi setup, plug it into a colour ramp, give the colour ramp a gradient of mostly black but then rapidly increase to white towards the end, plug the colour output into a multiply node, reduce the second value to about 0.1 and finally plug that into the emission strength. You can play around with the gradient the multiplication value.
Now, for the volume scatter, we need two different Voronoi setups, one for the colour and one for the density. You can use the same colour ramp multiply with different values for the multiplication and the gradient in the colour ramp. For the colour, we can use a colour ramp without the multiplication and scatter the light that we DON'T want to see. In my example, I scatter blue light, so the stars behind it seem more red.
By the end you should have a shader graph that looks something like so:
Finally, you can use the same method we used to spread out the stars for the nebula (but don't enable proportional scaling).
Rendering our Scene
Now we need to render our scene. To do this, create a camera at the origin and point it along one of the axes. Now set the length of your animation to 6 frames and keyframe the rotation of the camera to each of the 6 directions (use the little diamond next to the value to keyframe it). Now head to your camera settings, select perspective mode, change the focal length mode to field of view and set it to 90 degrees. Now head to output settings and use a square resolution (eg 1000x1000 or higher). Set the output directory, hit render animation and wait for it to finish.
When it is done, we will not yet be able to use these in Godot. This is because Godot does not support a skybox using a cube mapping (unless you want to change the source of Godot to make it work). Instead, we need a panoramic sky. To make this, there is a lovely resource on GitHub to convert your renders into a panoramic image: https://danilw.github.io/GLSL-howto/cubemap_to_panorama_js/cubemap_to_panorama.html. Once you have done this, download the panorama and move onto the last step.
Putting our Panorama into Godot
If you have not got an environment node in your root node yet, do it now and create a blank environment to go in that node. Now head into background in the environment, select 'Sky' and use a 'panoramic sky'. You can then select your panorama as an image if you have put the panorama in your project folder. You should then immediately see the background appear in the editor if you are in 3D mode! If not, make sure you are previewing the root node since, in the editor, only the selected node and it's children will be visible. You can then export and test your game to see how the background feels in game.